You finally brought home a tray of new seedlings, eager to watch them grow into lush herbs and vibrant flowers. But a week later, they’re looking sad… what went wrong? Don’t worry – we’ve all been there. Caring for baby plants in their first week can be tricky, and even well-meaning new plant parents make a few common missteps. This guide will help you spot (and avoid) those first-week mistakes so your little green ones can settle in and thrive. 🌱💚
Whether you’ve adopted aromatic herbs like sweet basil or peppermint, a fragrant flower like lavender or marigold, or even a medicinal plant like Indian Borage, the first week at home is crucial. Let’s nurture those new seedlings together by avoiding these five common mistakes:
1. Drowning Them with Too Much Love (Overwatering)
The Mistake: In our enthusiasm to help our plants, we often give too much water. New seedlings usually come in small pots or cups, and it’s easy to think they need constant watering. However, overwatering is the number-one rookie error – it can waterlog the soil and suffocate the young roots. You might notice yellowing leaves or even a fungal film on the soil surface (a sign of “damping off”, a fungus that attacks overwatered seedlings).
Why It’s a Problem: Baby roots need oxygen as much as they need water. Soggy soil deprives roots of air, invites root rot, and can lead to weak or dying seedlings. In Nigeria’s warm climate, soil can dry out quickly, but standing water is never good – it breeds disease and mold.
How to Avoid It: Water lightly but frequently. Check the soil moisture with your finger each day – the top inch should feel slightly moist, not soaked. A great rule is to water only when the topsoil starts to dry out. Ensure your seedling’s container has drainage holes so excess water can escape. If you have a tray beneath the pot, empty any standing water. In very dry, hot periods (hello, harmattan season!), you might need to mist or water more often, but always feel the soil first. Remember: it’s easier to rescue a thirsty seedling than a drowned one. 💦
2. Poor Lighting and Sunburn Scenarios
The Mistake: Placing new seedlings in insufficient light – or at the other extreme, under harsh direct sun immediately. Both scenarios stress your baby plants. For instance, leaving a mint or basil seedling in a dim corner will make it grow thin and “leggy” (stretching towards light). On the flip side, taking a nursery-grown seedling and plopping it in scorching midday sun on day one can sunburn the tender leaves.
Why It’s a Problem: Light is food for plants. Too little light makes seedlings weak, pale, and lanky as they reach out desperately (you’ll see them bending toward a window – a sure sign they need more sun). But too much intense sun too soon can dry out or scorch the leaves, since the seedlings aren’t acclimatised yet. Think of it like our skin – you don’t go from indoors to a full day of sun without a bit of exposure training!
How to Avoid It: Aim for gentle, filtered sunlight for the first few days at home. Most herbs and flowers (like lavender or marigold) love sun, but start them off with morning sun or bright indirect light. Gradually increase their sun time over the week. If a plant is known to prefer full sun (6–8 hours a day), give it that in stages: maybe 3 hours on day one, 4–5 on day three, and avoid the 12–3pm intense period initially. If you’re keeping seedlings indoors, place them by the brightest window you have (south or east-facing is ideal) or use a grow-light. You’ll notice your seedlings staying short, sturdy and rich green with enough light. And if you see them wilting in afternoon sun, give them a bit of shade or bring them in during that peak heat. It’s all about balance – plenty of light, but not a sudden sun shock. 🌞
3. Not Repotting or Transplanting Soon Enough
The Mistake: Letting your new seedlings linger too long in their tiny nursery pots or transplanting them carelessly. We get it – life gets busy and that little mint seedling in a plastic cup looked fine at first. But in those first few days, the roots can quickly outgrow the cramped space or use up the soil’s nutrients. Conversely, some folks do the opposite: they rush to transplant but handle the seedling roughly or plant it at the wrong depth, causing transplant shock.
Why It’s a Problem: Pot-bound seedlings (in undersized cups) dry out very fast and can become stunted. You might see roots poking out the drainage holes or circling inside the cup – a sign they need more space. Leaving a seedling too long in a small pot can lead to nutrient deficiencies and stressed roots. On the other hand, poor transplant technique – like breaking the root ball apart, planting the stem too deep/shallow, or not watering after transplant – can set the plant back dramatically. The seedling may wilt or stop growing as it struggles to recover.
How to Avoid It: Plan to repot or transplant your seedlings within the first 2–3 days of bringing them home. Gently move them to a slightly larger pot with fresh potting mix, or into your garden bed, following best practices:
- Transplant in late afternoon or evening (or early morning) when the weather is cooler. This way, the plant has overnight to start settling before facing harsh sun.
- Handle with care: Keep the root ball intact. Tap the seedling out of its cup without tugging the stem. If it’s root-bound, loosen gently but don’t tear all the roots.
- Plant at the same depth it was in its nursery pot. Burying the stem too deep can invite rot; planting too shallow can expose roots. Firm the soil around it lightly.
- Water immediately after transplanting to settle the soil around the roots. Then keep the soil lightly moist (not waterlogged, as per Mistake #1!). Consider providing a bit of shade for a day or two if the sun is intense – even a piece of cloth or newspaper tent can help.
Your goal is to make the move as stress-free as possible. When done right, your seedling will hardly know it’s been moved – until it suddenly has room to stretch its roots and grow! 🌱🪴
(Need a step-by-step refresher on potting up herbs? Check out our related guide on starting a mini herb garden on your balcony for more transplanting and container tips.)
4. Using the Wrong Soil or Container (No Drainage, Heavy Soil)
The Mistake: Potting your seedlings in whatever dirt you have around – for example, scooping heavy garden soil into a container with no drainage holes, or reusing old soil that might harbor pests. New plant parents sometimes assume “soil is soil,” but young seedlings need the right environment to get started.
Why It’s a Problem: Regular garden soil can be too dense for potted seedlings, leading to poor drainage and little air reaching the roots. Water gets trapped (especially if the pot lacks holes), and you end up with – you guessed it – soggy roots and unhealthy plants. Also, soil from outside could carry bacteria or insect eggs that a delicate indoor seedling isn’t ready to battle. In short, the wrong soil or a non-draining pot can turn your nurturing efforts into a nightmare of moldy, drowning, or diseased seedlings.
How to Avoid It: Set your seedlings up for success with light, well-draining soil and proper containers:
- Use quality potting mix: It’s formulated to be fluffy and airy, often with ingredients like coco peat or perlite to improve drainage. This ensures roots can breathe and expand easily. If planting directly in a garden bed, mix in compost or sandy loam to improve soil texture – your marigold and other seedlings will appreciate the nutrient boost and air pockets.
- Choose pots with drainage: Always, always ensure any pot or container has holes at the bottom. If you fell in love with a cute pot with no hole, consider drilling one or use it as a decorative cover for a functional pot inside. Good drainage prevents water from pooling at the bottom and keeps roots healthy.
- Clean or new soil: If reusing pots, throw out any old soil and sterilise the pot (a mild bleach solution rinse works) to kill lingering germs. Start your seedlings in fresh mix so they aren’t exposed to pests/diseases from the get-go.
- Right size pot: Don’t jump to an enormous pot either – a pot just one size up from the nursery cup is ideal. Too large a pot holds excess water in the soil that the small roots can’t use yet, which again can cause rot.
By giving your seedlings the equivalent of a comfortable, clean new home – good soil, good drainage – you’ll notice they establish faster. Healthy roots mean a healthy plant up top! 🌿
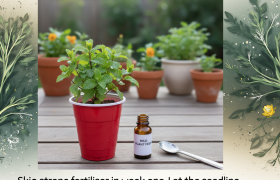
5. Overfeeding Early (Fertiliser Frenzy)
The Mistake: “If a little plant food is good, a lot must be better, right?” Not so fast! A common mistake is fertilising seedlings too soon or too heavily. In the excitement to see your baby plant shoot up, you might be tempted to douse it with liquid fertiliser or sprinkle granules right after planting. Unfortunately, this can do more harm than good in week one.
Why It’s a Problem: Freshly potted or transplanted seedlings are in a delicate, adjusting phase. Their roots are tender – blasting them with strong fertiliser can burn the roots or force growth that the young root system can’t support. It’s like giving a newborn baby a full adult meal – they’re not ready for it! Plus, quality potting mixes often come with a small starter charge of nutrients, and we usually transplant seedlings into compost-enhanced soil, so they aren’t starving initially. Overfeeding can upset the soil’s nutrient balance and even invite pests (lush, overfed growth can attract aphids and others).
How to Avoid It: Hold off on the plant food bar for a little while. 😇 For most seedlings, wait 1–2 weeks before the first feeding. Let the plant settle and put out new roots in its new soil. When you do start feeding:
- Begin with a diluted, gentle fertiliser. If you have an all-purpose liquid fertiliser, mix it at half the recommended strength for the first feed. Organic options like fish emulsion or seaweed extract are typically mild – those are great starters (just be mindful of using them indoors due to smell).
- Alternatively, use a slow-release organic fertiliser sparingly when potting – something like worm castings or a tiny pinch of compost mixed into soil. This provides a low, gradual nutrient supply that won’t overwhelm the plant.
- Observe your plant. If it’s putting out new, green growth in the first week or two, it likely has what it needs from the soil. The best “food” initially is sunlight and water (in the right amounts). Think of fertiliser as a boost for an established plant, not a rescue for a struggling seedling. If your seedling looks peaky for reasons other than hunger (often it’s water or light issues), address those basics first rather than reaching for the fertiliser bottle.
By avoiding an early fertiliser frenzy, you’re preventing chemical burn and encouraging your seedlings to first grow a strong root network. In a couple of weeks, you’ll have a robust plant that can gobble up nutrients happily when it’s time to feed. 🍽️🌱
In Summary: Give Them a Great Start
Your first week with new seedlings should be a time of enjoyment, not mystery or heartbreak. 😅 By sidestepping these common mistakes – overwatering, poor lighting, delayed or clumsy transplanting, bad soil/drainage, and premature feeding – you set the stage for your seedlings to flourish. Think of yourself as a gentle guide in that first week: providing sips of water, just the right amount of sun, a comfy new home, and patience before heavy meals.
Soon you’ll see your little plants perk up, unfurl new leaves, and even shoot up a bit taller. Each success, whether it’s a basil for your kitchen or a blooming marigold on your balcony, is a win for you as a plant parent. And if something does go wrong, don’t be too hard on yourself – plants are forgiving with a bit of TLC.
Ready to grow more? 🌻 Explore our range of healthy, naturally raised plant seedlings to find your next green baby. From mints (spearmint, menthol mint, and more) to medicinal herbs and ornamentals, we’ve got you covered. You can also reach out anytime for guidance – we love to help fellow gardeners.
For quick questions or personalised tips, send us a message on WhatsApp (it’s fast!): Chat with Green Unison🌱. We’re happy to assist with any seedling care inquiries or order requests. You can even browse our WhatsApp catalog for products here: wa.me/c/2348103043789.
Good luck with your new plant babies, and happy gardening! 🌱🎉 You’ve got this – may your home be ever greener and your thumbs ever greener too. 😊👍
Leave a Reply