If you’ve ever made corn flour swallow and it suddenly starts “drawing” like chewing gum (or turns rubbery), you’re not alone. The good news? Most times, it’s not that anything is “wrong” with you — it’s usually water + heat + turning technique
Yorùbá (kíákíá): Bí swallow ìyẹ̀pẹ̀ agbàdo rẹ bá ń fa tàbí di gígùn bí gọ́ọ̀mù, ó sábà máa jẹ́ omi tí kéré, ina tó ga, tàbí bí o ṣe ń yí i. Ẹ jọ̀ọ́, ẹ má bínú — a máa fix rẹ.
When corn flour meets hot water, the starch granules swell and thicken (that’s normal). But when the mix becomes too tight, overheated, or worked wrongly, it can turn stretchy-rubbery instead of smooth and soft.
Yorùbá: “Draw” túmọ̀ sí pé swallow náà ń fa, kì í sì jẹ́ kí o yà a dáadáa — ó ń dà bí ẹni pé o ń jẹ gọ́ọ̀mù.
Quick Fix Checklist (try this in 5 minutes)
If your tuwo is already drawing:
Reduce heat to low.
Add hot water (small splashes) around the edges — not cold water.
Cover for 60–90 seconds to steam.
Fold/turn gently until it relaxes.
If it’s still too tight, repeat with another small splash of hot water.
Yorùbá: 1) Dín iná kù. 2) Fikun omi gbóná díẹ̀ díẹ̀ (kì í ṣe omi tútù). 3) Bo fún ìṣẹ́jú kan. 4) Yí i sẹ́lẹ̀ sẹ́lẹ̀ títí yóò fi rọ.
7 reasons corn flour swallow draws (and how to fix each one)
1) Your water-to-flour ratio is too low (it’s simply too thick)
Symptom: It becomes tight early and starts pulling. Fix: Use the reliable base ratio:
1 cup corn flour : 2 to 2½ cups water
If you like it softer, stay closer to 2½ cups.
Yorùbá: Bí omi bá kéré ju, swallow máa di gígùn. Fikun omi díẹ̀ díẹ̀ (omi gbóná).
2) You poured too much flour at once
Symptom: It thickens too fast; you fight lumps, then it becomes rubbery. Fix: Add flour gradually while stirring/whisking at the start.
Pro tip: Start with a small portion first, let it thicken, then add the rest in batches.
Yorùbá: Má ṣe tú ìyẹ̀pẹ̀ pọ̀ sílẹ̀ lẹ́ẹ̀kan. Tú un díẹ̀ díẹ̀.
3) Heat is too high after adding the flour
Symptom: It “sets” too quickly and turns chewy. Fix: Once water boils, reduce to medium/medium-low before adding flour. Keep it controlled.
Yorùbá: Iná tó ga máa mú kí ó “di” kíákíá. Dín iná kù sí àárín.
4) You used the wrong mixing method (or over-whisked)
Symptom: It becomes gluey/stretchy instead of smooth and soft. Fix:
Whisk only at the beginning to prevent lumps.
Switch to a wooden spatula/turning stick to finish.
Turn firmly, but don’t “beat” it like cake batter.
Yorùbá: Whisk jẹ́ fún ìbẹ̀rẹ̀. Lẹ́yìn náà, lo ọ̀pá/yíyí (turning stick) kí o sì yí i dáadáa.
5) You kept “dry-patching” (adding extra flour to “correct” softness)
Symptom: It starts okay, then gets tight and draws later. Fix: If you need to adjust texture, do it with hot water, not more flour.
Yorùbá: Tí ó bá rọ ju, má ṣe fọwọ́sí i pẹ̀lú ìyẹ̀pẹ̀ míì. Omi gbóná ló yẹ.
6) You left it covered too long without turning
Symptom: The top looks fine, but underneath sets like rubber. Fix: Cover briefly (1–3 minutes max), then turn again.
Yorùbá: Bo díẹ̀ ni. Lẹ́yìn náà, yí i padà.
7) It cooled down (and firmed up)
Symptom: Smooth when hot; rubbery/firm after sitting. Fix:
Serve tuwo hot.
If it sits, reheat gently with steam + a tiny splash of hot water and fold.
Yorùbá: Swallow fẹ́ràn gbígbóná. Tí ó bá tutù, jẹ́ kó gba ẹ̀fúùfù-omi (steam) kí o sì yí i.
Foolproof method for smooth, non-rubbery corn flour tuwo
Bring 2–2½ cups water to a boil (for 1 cup flour).
Reduce heat to medium.
Add corn flour gradually while whisking.
Once it thickens, switch to a spatula/turning stick and turn until smooth.
Cover 1–2 minutes, then turn once more.
Serve hot.
Yorùbá (ìlànà kúkúrú): Gbé omi dé bíbo → dín iná kù → tú ìyẹ̀pẹ̀ díẹ̀ díẹ̀ → whisk → yí i pẹ̀lú ọ̀pá → bo díẹ̀ → yí i lẹ́ẹ̀kansi → jẹun.
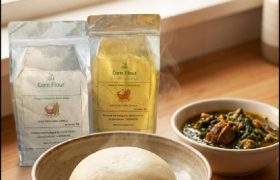
“Corn flour” vs “cornflour” (important note)
In some places, “cornflour” can mean pure cornstarch (used mostly for thickening sauces). In this post, corn flour means finely milled maize flour used for tuwo/swallow — like the one we sell.
💬 Chat to order (prefilled message): https://wa.me/2348103043789?text=Hi%20Green%20Unison%20%F0%9F%91%8B%20Please%20help%20me%20order%20your%20Silky%2FWhite%2FYellow%20Corn%20Flour%20for%20tuwo.%20I%20need%20the%20best%20water%20ratio%20%2B%20tips%20to%20stop%20my%20corn%20flour%20swallow%20from%20drawing%2Frubbery.
Final word (small, but powerful)
If your corn flour swallow draws, don’t panic. In most kitchens, the fix is simply: more hot water (small splashes), lower heat, and gentler turning.
Yorùbá: Ẹ má yá. Ọ̀pọ̀ ìgbà, ìtúnṣe rẹ̀ ni: omi gbóná díẹ̀ díẹ̀ + iná kékèké + yíyí pẹ̀lẹ́pẹ̀lẹ́.
Happy cooking — and may your tuwo be soft, smooth, and proudly non-dramatic.
If your kitchen already has corn flour, plantain flour and groundnut flour, you’re sitting on a mini “superfood corner” without even realising it.
These three pantry staples are more than swallow and pap ingredients. Used well, they can help you:
build more satisfying meals from simple ingredients
enjoy familiar local foods with a little more balance
reduce how often you rely on heavily processed snacks
In this post, we’ll unpack – in plain language – what each flour brings to your plate, plus simple, realistic ways to use them every day.
Kind note: This article is for general food inspiration only and is not medical or nutrition advice. Always speak with a qualified health professional for personalised guidance.
What makes these flours “local superfoods”?
“Superfood” is a marketing word, but there is something special about everyday flours made from whole local crops:
Corn flour – a source of complex carbohydrates, some fibre and naturally occurring vitamins and minerals that provide gentle, steady energy.
Plantain flour – made from unripe plantain, offering complex carbs, fibre and resistant starch, with a mild flavour that fits breakfast, swallow and snacks.
Groundnut flour – a concentrated way to add plant protein, healthy fats and flavour to simple meals like pap, soups and smoothies.
When the flours are carefully dried and finely milled – like the nature-powered flours from Green Unison – you get the benefits of the original crop in an easy, scoopable form.
Swallow that feels light but satisfying When you want something different from the usual swallows, plantain flour is a great option – soft on the tongue yet filling enough to carry your favourite soups.
Snack and dessert twist A small amount of plantain flour can be blended into pancake batters, waffle mixes or simple home snacks for a gentle sweetness and extra body.
If you grew up snacking on hot roasted groundnuts, you already know how addictive that crunch can be.
What many people don’t know is that you can get that same street‑style flavour at home without sand, without an oven, and without stress — just a pan and a little garri.
In this guide, we’ll walk through a simple, local way to roast groundnut with garri, using everyday tools. We’ll also share practical tips on how to keep it crunchy, how to reuse the garri, and how to store the nuts so they stay fresh for longer.
Measure out about 2 cups of groundnuts into a bowl.
2. Salt soak with hot water
Add 1–2 tablespoons of salt over the groundnuts in the bowl.
Pour enough hot water to fully cover the nuts.
Stir so the salt distributes evenly.
Let the groundnuts soak for about 5 minutes.
This quick soak lets a little salt enter the skin and helps the nuts roast more evenly.
If you prefer very lightly salted groundnuts, use less salt or rinse an extra time later.
3. Rinse and drain
Pour the groundnuts into a sieve or colander.
Rinse briefly under clean water to remove excess surface salt.
Shake the sieve gently to remove as much water as possible.
At this stage, the nuts should be damp but not dripping.
4. Pre‑dry on a tray (sun or fan)
Spread the damp groundnuts out in a single layer on a flat tray or wide plate.
If there is good sunlight, sun‑dry for about 2 hours.
If the weather is dull, place the tray in a well‑ventilated spot and let a fan blow over it.
You’re not trying to fully dry them like raw nuts again — just enough so they are no longer wet on the surface. Slightly moist inside, dry on the outside, is perfect for even roasting.
You’ll know they’re ready when:
The skins no longer look shiny‑wet.
The nuts separate easily when you run your fingers through them.
5. Preheat the garri
Place a dry frying pan on low heat.
Pour in ½–1 cup of garri, depending on the size of your pan and the quantity of groundnuts. The nuts should sit inside the garri, not on bare metal.
Stir for a minute or two to warm the garri.
The garri should feel hot when you hover your hand above it, but it should not be browning yet.
6. Add the groundnuts
Gently pour the prepared groundnuts into the pan of hot garri.
Immediately start stirring and folding so that:
Garri covers the groundnuts.
The nuts are constantly moving and not sitting on one spot.
Think of it as shallow‑frying in dry garri instead of oil.
7. Stir, rest your hand, then stir again
This is the part your arm will remember.
Keep the heat low to medium‑low.
Stir continuously for a few minutes.
You can rest your hand for about 5 seconds, but don’t walk away — return to stirring so nothing burns.
Low, steady heat + frequent stirring = evenly roasted nuts and garri that doesn’t burn before the nuts are ready.
You’ll start to hear gentle popping sounds and smell that familiar roasted aroma.
8. Watch the colour
As the nuts roast:
The groundnut skins shift from a raw, pale tone to a light golden‑brown.
The garri also changes colour, picking up some of the oil and colour from the nuts.
A good rule of thumb from the kitchen:
Your groundnut is ready when the garri is roughly the same colour as the nuts.
If you like a deeper roast (more brown, more intense flavour), keep going for a few extra minutes, still on low heat, stirring consistently.
9. Take off the heat and separate
Once you’re happy with the colour:
Turn off the heat.
Pour the contents of the pan into a dry sieve placed over a bowl or tray.
Shake gently so the garri falls through and the groundnuts stay in the sieve.
Spread the hot groundnuts on a tray so they can cool quickly and evenly.
Important: They will feel slightly soft while still hot. Don’t panic — they get crunchier as they cool down.
10. Let them cool completely
Allow the roasted groundnuts to cool down completely at room temperature.
This can take 20–30 minutes depending on the room temperature and the amount roasted.
Avoid covering them while they are still hot — trapped steam can soften them again.
Once cool, taste a few. If they taste slightly under‑roasted for your liking, you can return them to the pan with a little fresh garri and roast for a few more minutes.
11. Peel (optional) and clean
If you like skinless groundnuts:
Rub small handfuls between your palms to loosen the skins.
Gently blow away the chaff outside or over the sink, or use a fan to help separate skins from nuts.
If you don’t mind the skins, you can skip this step completely and enjoy them as‑is.
12. Store in an airtight container
Transfer the fully cooled roasted groundnuts into a clean, dry, airtight container:
A glass jar with a tight lid
A food‑grade plastic container
Or resealable pouches
Store in a cool, dry place away from direct heat and strong smells.
For best flavour, aim to finish a batch within 2–3 weeks. If you’re roasting a lot at once, you can keep part of it in the freezer in a well‑sealed container and bring it out in small portions.
What about the garri — can you reuse it?
Yes, you can reuse the garri for another roasting session as long as:
It hasn’t burned.
It’s not full of groundnut skins or debris.
It’s been stored in a clean, dry container after cooling completely.
Simply cool the garri, sieve out loose skins or burnt particles, and keep it airtight until the next time you want to roast.
To keep things simple and hygienic, it’s best to reuse this garri mainly for roasting, not for drinking or soaking as regular garri.
Pro tips for consistently crunchy groundnuts
Low heat is your best friend. High heat will burn the outer layer before the inside cooks.
Don’t overload the pan. Roast in batches if you have a small pan.
Listen for the pops. Gentle popping and a strong roasted aroma usually mean you’re close.
Remember the cool‑down effect. If they are already very crunchy while hot, they may end up too hard when fully cool.
Salt carefully. You can always sprinkle a little fine salt after roasting; it’s harder to fix “too salty”.
Quick ways to enjoy your roasted groundnuts
Once you’ve nailed this method, the options are almost endless:
Snack on them plain or lightly salted.
Pair them with chilled soaked garri, sugar and milk if you like.
Sprinkle over salads or grain bowls for extra crunch.
Blend into quick homemade peanut butter.
Use them as a base for sauces and soups.
And because you roasted them yourself, you know exactly how they were handled from start to finish.
FAQs
1. Do I still need to sort Green Unison groundnuts before roasting?
Both work. Use plain garri without sugar, milk, pepper or flavourings. The colour of the garri doesn’t affect the method — only the final shade, and even that is minor.
3. Can I use this method without sun‑drying?
Yes, but you still need to get surface moisture down.
If the sun isn’t strong, spread the soaked nuts on a tray near a fan or in a breezy spot until they stop looking wet. Going straight from water to pan makes them steam instead of roast.
4. Can I roast groundnuts in a non‑stick pan?
Yes, as long as you:
Keep the heat low to medium‑low.
Use only wooden or silicone utensils that are safe for your pan’s coating.
Avoid scratching the surface while stirring.
5. Is this method suitable for people with peanut allergy?
No. If you or anyone around you has a peanut or nut allergy, this snack is not suitable. Always follow medical advice and keep roasted groundnuts away from anyone who is allergic.
Ready to try it?
If you’re excited to test this method, start with groundnuts that are already clean and roast‑ready:
Do you often feel hungry just an hour after breakfast? It might be time to power up your pap and smoothies with a simple, natural addition: groundnuts! In this post, you’ll learn why groundnuts are a nutrient-dense upgrade, how to use them in pap and smoothies, and science-backed reasons they keep you fuller and more energized—all while staying delicious and easy.
What You’ll Learn
Why groundnuts instantly boost the nutrition of pap and smoothies
Easy ways to add roasted groundnuts, peanut butter, or groundnut flour
How groundnuts fit into year-end wellness and harmattan season eating
How to shop high-quality groundnuts easily (with links)
Why Add Groundnuts? (The Nutrient Boost)
Groundnuts are more than a snack—they’re a compact source of:
✔ Plant Protein + Healthy Fats
Groundnuts contain approximately 25% protein and heart-friendly fats, helping you stay full longer and maintain steady energy.
✔ Fiber + Essential Vitamins
With fiber plus vitamins like Vitamin E, magnesium, biotin, and B-vitamins, groundnuts support digestion, immunity, and skin health.
✔ Antioxidants
Groundnuts naturally contain compounds like resveratrol and flavonoids—great for cellular protection and overall wellness.
In short: adding groundnuts transforms pap and smoothies from plain carbs into balanced, nutrient-rich meals.
How to Upgrade Your Pap with Groundnuts
Pap (ogi/akamu) is comforting—but on its own, it’s mostly carbohydrates. Adding groundnuts completely changes that.
1. Stir in Groundnut Flour
Mix 1–2 tablespoons of finely ground groundnut flour into hot pap.
Makes pap richer
Adds protein and healthy fats
Creates a creamy, nutty taste
2. Add Peanut Paste or Peanut Butter
A spoonful boosts flavor and makes pap more filling.
3. Top with Crushed Groundnuts
For those who enjoy texture, sprinkle crushed roasted groundnuts for crunch + nutrition.
Cultural note: Traditional Tom Brown mixes (roasted grains + groundnuts) show how well groundnuts pair with pap for nourishment.
How to Upgrade Your Smoothies with Groundnuts
Smoothies taste great—but without protein, they may not keep you full. Groundnuts fix that immediately.
1. Add Peanut Butter
One spoon = creamier texture + protein + healthy fats.
2. Blend Roasted Groundnuts
Your blender turns them into fresh peanut cream inside the smoothie.
3. Use Groundnut Flour
Perfect for people with small blenders. Two spoons disappear smoothly into your drink.
Why it Works
The combination of protein + fiber + fat digests slowly, keeping you full much longer. Many people say groundnut smoothies keep them satisfied till lunchtime or beyond.
Groundnuts for Year-End Wellness (Detox & Harmattan Season)
As harmattan approaches, groundnuts become even more useful.
✔ Skin Support
Healthy oils in groundnuts help nourish your skin from within during dry weather.
✔ Whole-Food Detox Support
During year-end “clean eating” resets, replacing processed snacks with whole foods like groundnuts supports digestion and metabolism naturally.
✔ Warmth + Energy**
Groundnuts provide slow, steady energy—perfect for chilly harmattan mornings paired with a warm bowl of pap.
Not all groundnuts are created equal — and how they’re handled matters. At Green Unison, we go beyond just selling groundnuts. We ensure you’re getting the purest, freshest, nutrient-rich form possible.
✔ Carefully Handled for Maximum Nutrition
Our groundnuts are slow-dried, gently processed, and never overheated, helping preserve their natural healthy fats, antioxidants, vitamins, and rich nutty flavour.
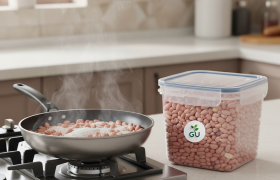
✔ Airtight, Reusable Packaging
Every pack is sealed in food-safe, airtight packaging designed to lock in freshness, protect nutrients, and allow easy resealing.
✔ Consistent Quality in Every Spoon
Each batch undergoes strict quality checks for a clean, uniform, wholesome experience.
Groundnut is one of those foods many people enjoy without thinking much about where it comes from. But the moment you taste truly farm-fresh groundnuts, the difference becomes obvious. The flavour is fuller, the crunch is better, and the natural aroma reminds you of how real groundnut should taste.
So what exactly makes farm-fresh groundnuts stand out from the store-bought ones? Here’s a simple, friendly guide to help you understand the difference especially if you want the best flavour for snacking, cooking or pantry storage.
1. Freshness Makes All the Difference
Store-bought groundnuts often sit on shelves for long periods. By the time they reach your kitchen, the oils inside may have started to lose their aroma and flavour.
Farm-fresh groundnuts, on the other hand, taste closer to how they were harvested — fuller, richer and naturally aromatic.
2. Cleaner Taste, Better Crunch
Groundnuts taste best when they haven’t stayed too long after drying. Freshly processed groundnuts offer a clean, satisfying crunch without any “stale” aftertaste.
This is one of the biggest differences you’ll notice immediately when you try farm-fresh options.
3. Naturally Processed vs Mass-Processed
Most store-bought groundnuts go through large-scale processing and long transportation routes before they arrive in shops. Along the way, they lose some of their natural flavour intensity.
Farm-fresh groundnuts are usually handled in smaller batches, which means the flavour remains more intact.
4. More Versatile for Everyday Eating
Because of their superior taste and freshness, farm-fresh groundnuts work well for:
snacking,
adding to pap or cereal,
blending into sauces,
mixing into baked goods,
pairing with fruits for quick energy.
Choosing Quality Groundnuts for Your Home
If you want clean, carefully processed groundnuts for everyday meals, you can order directly from Green Unison: